
I decided to rebuild my NanoPi Neo2, this time with a docker container running Pi-Hole. The main reason for this is to simply avoid 'bricking' the device with Pi-Hole updates, tweaking,etc.
I installed Portainer, which provides a nice web GUI for managing Docker with little resource overhead, and Watchtower, which will update containers on the host Pi gracefully.

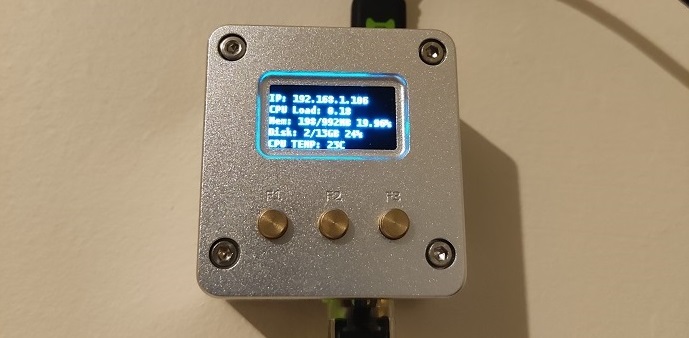
img |
: The NanoPi NEO2 with metal case: front OLED display + 3 physical buttons.
|
The NanoPi NEO2 Black kit comes driver-ready with Ubuntu Core on a micro-SD card.The OLED display and first two physical buttons offer interactive device/display functions, the third button gives a device reboot menu. The slick metal casing also serves as a heatsink.
The below guide goes through how I got my device configured and up and running on my home network, it should only take around 30 minutes.
#1 Configure the NanoPi
##1 NanoPI setup

# Assign an IP to the NanoPi.
# Connect a USB power supply + ethernet cable.
# Check the attached devices on your routers for its IP.
# Then login via SSH:

> Use the default credentials for friendly elec Ubuntu Core image:

      User: root
      Password: fa
    # Yes their default root password is only 2 letters.

> Change the root password:

      $ passwd
    # Set your new password.

> Then run the config utility:

      $ npi-config
    # Set the desired options: hostname [pi-hole], timezone [Europe/Dublin].

> Exit the config utility, run updates and install docker & curl:

      $ apt-get update
      $ apt-get install curl jq docker.io

# It is also a good time to reboot the NanoPi now.
# You should also enable SSH key-based authentication.

img |
: Top view - internal red LED lights reflect the device activities.
|
#2 Networking
SSH back in and set a static IP address, you can stick with whatever DHCP address the Pi received or change it to a different IP here, the below example is on my 192.168.1.0/24 network (DGW 1.1):
##2 Configure a static IP

# This IP will be the default web interface for Pi-Hole

> Run the following to set a static address of 192.168.1.100:

      $ nmcli connection modify 'Wired connection 1' connection.autoconnect
yes ipv4.method manual ipv4.address 192.168.1.100/24 ipv4.gateway 192.168.1.1
ipv4.dns 192.168.1.1
    # In the above example I have set mine to 192.168.1.100 but you can choose any.

> Reboot and SSH back in again via the new/static IP.
I am using Windows for configuring this setup, if you need a nice SSH client I recommend Bitvise [free to download]. You can see below thatI have logged on securely via SSH using my password protected [an optional step] private key.
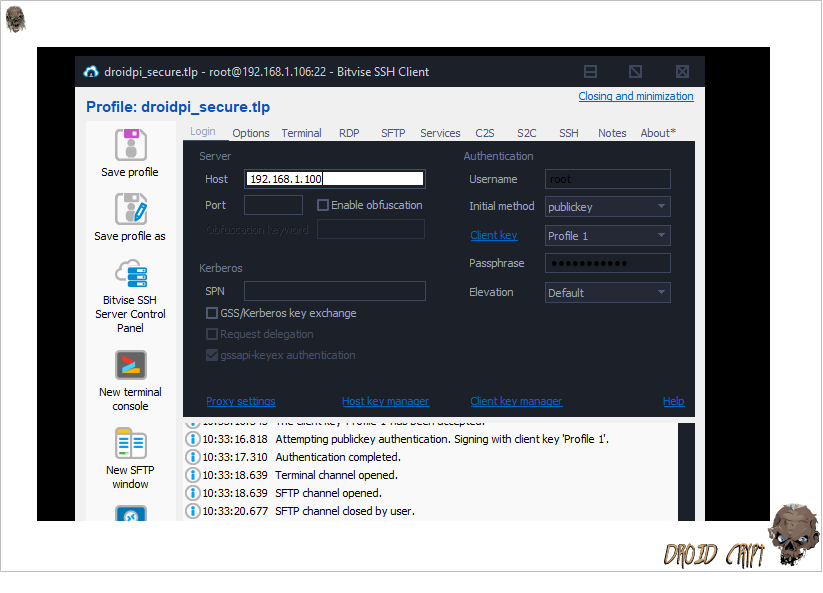
img
|
: SSH securely via your public/private keypair rather than user/password.
|
SSH keypair configuration details below. Make sure to disable password authentication only once you have tested logging in via your private key so that you don't lock yourself out.
# Configure SSH

      $ mkdir -p ~/.ssh

# Create the SSH directory

      $ echo public_key_string >> ~/.ssh/authorized_keys

# Add your ssh-rsa public key to the authorized keys file.

      $ chmod -R go= ~/.ssh

# Restrict access to the directory.


> You can now test logging in via the client key method.

      $ vi /etc/ssh/sshd_config
      > PasswordAuthentication no

# Set password authentication to no.

      $ sudo systemctl restart ssh

# Restart the SSH service.
#3 Portainer
Run the following to get Portainer up and running which we can then access via any web browser and in turn manage all of our containers via the web UI:
##3 Portainer

# This IP will be the default web interface for Pi-Hole

> Run the following to get Portainer up and running which we can then
  access via a web browser:

      $ docker volume create port_data

# Creates a new volume that containers can use and store data in.

      $ docker run -d -p 8000:8000 -p 9000:9000 --name=portainer
--restart=always -v /var/run/docker.sock:/var/run/docker.sock

      -v port_data:/data portainer/portainer

# Portainer is now running as a docker container.

> Test logging in via your web browser:

      $ http://192.168.1.100:9000

# Follow the instructions to set a default admin password.
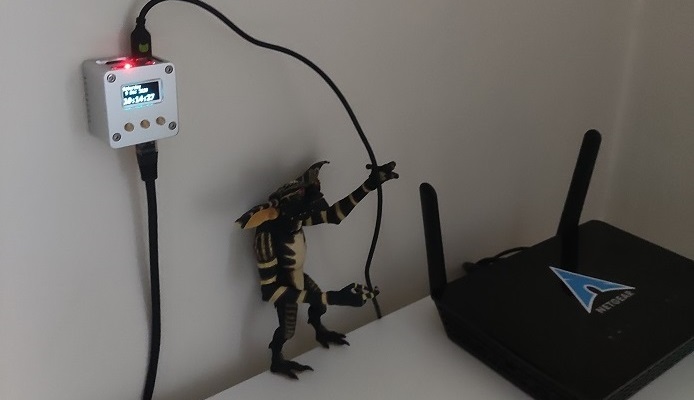
img |
: Simple setup Gremlin.
|
#4 It's always DNS
The reason for this host configuration step is that if Pi-Hole is ever down or not running, we will still have name resolution on the host itself. Run the following to terminate the local DNS resolver running on this Ubuntu/Core image:
##4 DNS

> Stop and disable the system services:

      $ systemctl stop dnsmasq
      $ systemctl disable dnsmasq
      $ systemctl stop systemd-resolved
      $ systemctl disable systemd-resolved

# Disable systemd-resolved from loading at boot

> Edit NetworkManager.conf:

      $ vi /etc/NetworkManager/NetworkManager.conf
      > dns=none

      $ systemctl restart NetworkManager.service
      $ reboot

# Reboot after performing the above steps.

> Then re-enable local resolution:

      $ rm /etc/resolv.conf

      $ vi /etc/resolv.conf
      > search droid.local
      > nameserver 192.168.1.1
      > nameserver 1.1.1.1
      > nameserver 1.0.0.1
      > nameserver 8.8.8.8

# Obviously here '192.168.1.1' will be your router IP.
# You can choose any custom nameservers.
#5 Watchtower Installation
You can easily install containers from the cli as below, and then browse to protainer and manage them via the GUI:
#5 Watchtower

> This one is straightforward, just configure it once:

      $ docker run -d \
--name watchtower \
-v /var/run/docker.sock:/var/run/docker.sock \
containrrr/watchtower

# That's it for Watchtower, it just runs itself.
#6 Pi-Hole
Now it is time, with all the prerequisites in place, to install Pi-Hole and rid our entire home network of unwanted content, ads and malware domains. This step will install a container in the same way as previously done for Portainer and Watchtower.
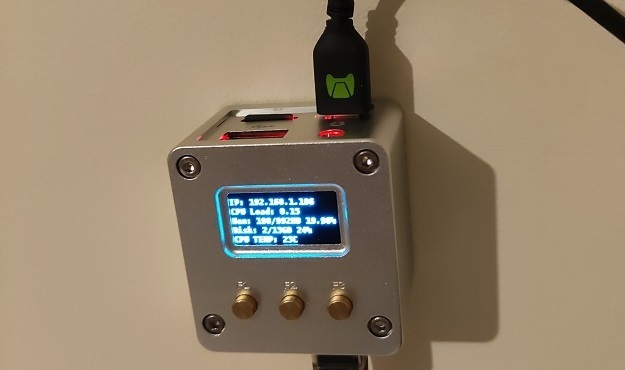
img
: IP, CPU Load, RAM, Disk Usage and CPU Temp are displayed on the second menu.
To configure Pi-Hole in docker, run the following from your command line:
#6 Pi-Hole DNS sinkhole

> Run the following code to create a fully fledged Pi-Hole container:

      $ docker run -d \
--name pihole \
-p 53:53/tcp -p 53:53/udp \
-p 80:80 \
-p 443:443 \
-e TZ="Europe/Dublin" \
-e ServerIP="192.168.1.100" \
-v pihole_etc:/etc/pihole \
-v pihole_dnsmasq:/etc/dnsmasq.d \
--dns=127.0.0.1 --dns=1.1.1.1 \
--restart=unless-stopped \
pihole/pihole:latest

# Now we will have a Pi-Hole container running bridged within docker.
The container will have a 172.x.x.x address. Docker containers are isolated from the rest of your network in this case, and everything is basically port-forwarded. You can also run it as 'host' but for the purposes of this guide I won't be.
#6 Pi-Hole DNS sinkhole

> Pi-Hole admin/web interface is now accessible:

      $ http://192.168.1.100/admin

# It runs on the default web port.
# You can add a host entry for your local domain.
If you have any problems with logging in with the default Pi-Hole admin password, you can change it via the web portainer console for Pi-Hole:
#6 Browse to the container and click on >_ Console

> On the console, run:

      $ pihole -a -p

# Change the Pi-Hole admin password as required.
#7 DNS again
With everything up and running, make sure to set your router and/or any devices DNS server address to the Pi-Hole IP address, otherwise no DNS lookups will be hitting the Pi-Hole.
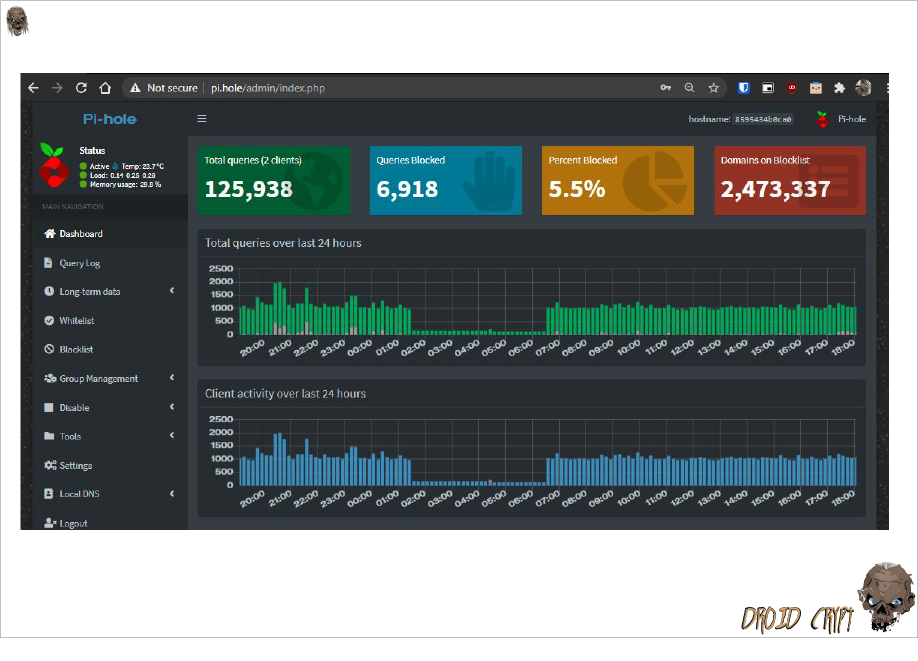
img |
: My admin dashboard showing the last 24 hours of DNS queries on my network.
|
#8 Custom Blocklists:
Here are some of the blocklists I am using, I have close to 2.5 million domains at this point as you can see from the right blocklist tab in the previous image.
##8 Custom blocklists to block even more malware domains

> Browse to Group management, Adlists:

      $ https://someonewhocares.co/hosts/zero/hosts
      $ https://v.firebog.net/hosts/Easyprivacy.txt
      $ https://osint.digitalside.it/Threat-Intel/lists/latestdomains.txt
      $ https://raw.githubusercontent.com/jonschipp/mal-dnssearch/master/mandiant_apt1.dns
      $ https://isc.sans.edu/feeds/suspiciousdomains_High.txt
      $ https://raw.githubusercontent.com/Sekhan/TheGreatWall/master/TheGreatWall.txt
      $ https://raw.githubusercontent.com/FadeMind/hosts.extras/master/UncheckyAds/hosts
      $ https://s3.amazonaws.com/lists.disconnect.me/simple_ad.txt


> To apply the new lists, go to Tools, Update Gravity or use the command below:

      $ pihole -g
That's it, you should now have network-wide DNS ad-blocking. This entire guide could become problematic if you choose to simply install Pi-Hole on a Raspberri Pi because you run the risk of having issues when playing around with settings or updating the software, etc.
For that reason, follow this guide and use Portainer for a smooth and easy configuration.
